Controllers
This section will help guide you through controller setup and button mapping.
General
To access controller settings, go to Settings > Controllers.
Here you will be able to select which Input Sources to use. Multiple Input Sources are available depending on what operating system you use.
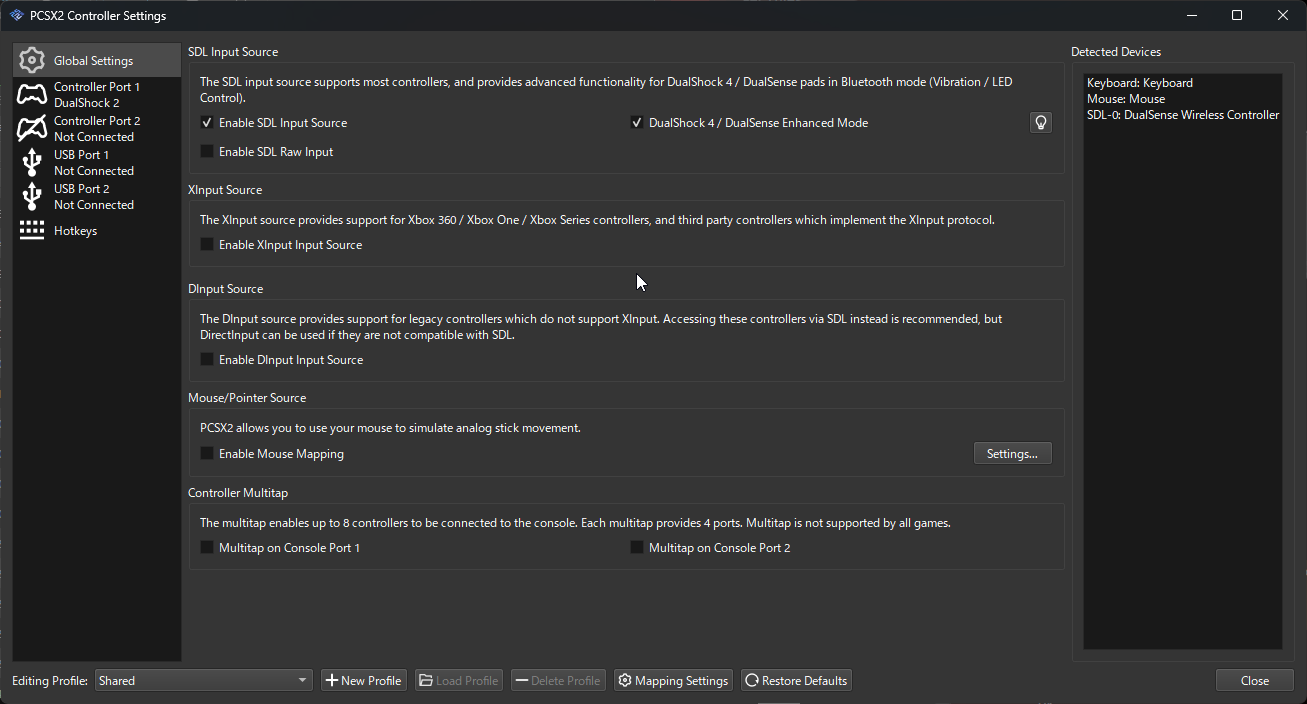
Input Sources
SDL (Recommended)
The preferred Input Source. SDL is cross-platform and should work for most controllers and operating systems. SDL also supports the "Automatic Mapping" button, which will fill out all mappings for you, including vibration motors.
DualShock 4 / DualSense Enhanced Mode
For official DualShock 4 and DualSense controllers only. This option enables additional features which allow control over LEDs and ensure vibration motors will function properly. We recommend all DualShock 4 or DualSense users to enable this option.
Once enabled, LEDs can be controlled using the lightbulb icon on the right side of the SDL section.
If you do not have one of these controllers, leave this setting disabled; there is no benefit to turning it on.
SDL Raw Input (Windows Only)
Some controllers may have issues with one or more of their inputs being incorrect or unresponsive. This is often caused by, but not limited to, third party manufacturers who steal a device ID from another controller, but then scramble the arrangement of the inputs.
This can typically be corrected by enabling SDL Raw Input. After enabling SDL Raw Input, you must manually map your controls - the Automatic Mapping button will not work properly. Click "Clear Mapping" to remove any existing mappings, then start mapping your controls one at a time using the buttons on screen.
If mappings continue to be unresponsive or incorrect, you may need to try one of the other Input Sources listed later in this page.
XInput (Windows Only)
In the event that an XInput compliant controller is unable to work through SDL, XInput is available as a backup Input Source. XInput also supports the "Automatic Mapping" button, which will fill out all mappings for you, including vibration motors.
Because XInput only works for XInput controllers, it is best practice to avoid using XInput unless SDL is not working for your controllers.
DInput (Windows Only)
DInput, or DirectInput, is an older Input Source included in PCSX2 as a last resort for old or third party controllers which do not work with SDL, or are not XInput compliant. DInput will not work with the "Automatic Mapping" button.
DInput is generally the least reliable Input Source. Avoid using it, unless your controller does not work with SDL or XInput.
Mouse/Pointer Source
Enables use of your mouse's motion as an Input Source. While mouse buttons are available to map at any time, mouse motion explicitly requires this Input Source to be enabled first.
Enabling this Input Source will hide the mouse cursor while emulation is running.
Mapping Your Controller Buttons
By default, two controller ports are available for mapping. Controller Port 1 and Controller Port 2 will correspond to the controller ports on the front of the PS2 console. Games will almost always expect the first player to use Controller Port 1; make sure you map this controller port first, before moving on to map a second device into Controller Port 2.
Start by clicking the "Automatic Mapping" button at the top right of the controller port screen, and select your controller from the dropdown list that appears. If the Input Source used supports "Automatic Mapping", then your mappings will automatically populate.
If you get an error message that "Automatic Mapping" is not supported for your controller, you will need to manually map all the buttons and analog sticks. Click on a button, then press the button on your controller you wish to map to it. Do this for all buttons you wish to have mapped.
Some third party controllers may fail to map using "Automatic Mapping", even with SDL Input Source enabled. These controllers must be mapped manually with SDL Raw Input enabled.
If SDL Raw Input is enabled, "Automatic Mapping" will continue to use the standard mapping, not the raw inputs. Controllers which have issues requiring SDL Raw Input should be mapped manually instead.
"Automatic Mapping" is not available for controllers using the DInput source.
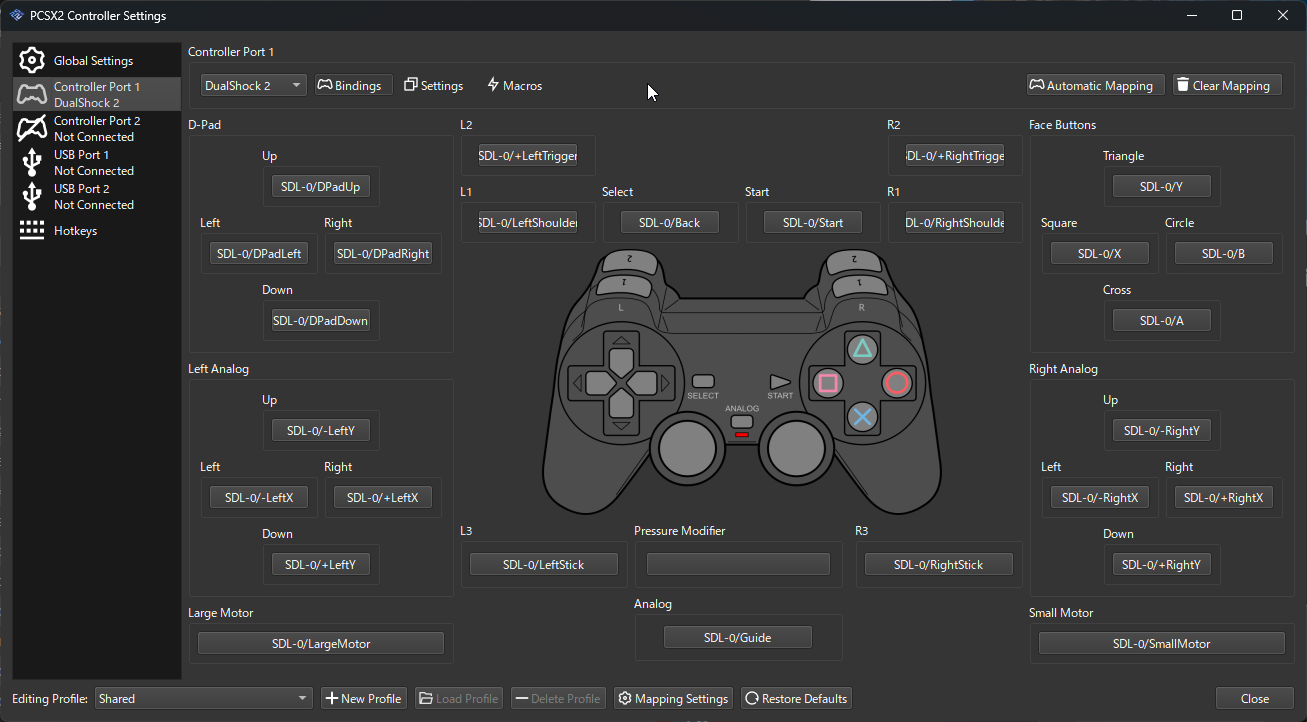
Special DualShock 2 Buttons
Some buttons on the DualShock 2 controller screen are special:
- Large Motor: The larger vibration motor. Clicking this will present a list of motors to select from. Pick the Large Motor entry matching your controller's Input Source, if available. If no such entry exists, your controller does not have a large motor available to use.
- Small Motor: The smaller vibration motor. Clicking this will present a list of motors to select from. Pick the Small Motor entry matching your controller's Input Source, if available. If no such entry exists, your controller does not have a small motor available to use.
- Pressure Modifier: A virtual button created by PCSX2 to help simulate pressure sensitivity. When you press this button, all other buttons will have their pressure data reduced to the "Pressure Modifier Amount" percentage specified in the Settings submenu.
- Analog: The ANALOG button found on a DualShock 2 controller. Most games lock the analog state and do not allow use of this button, but for games which do allow its use, it can be mapped here.
Clearing Mappings
Mappings can be cleared one at a time by right clicking their mapping buttons. You can clear all mappings for the controller port by clicking "Clear Mapping" at the top right.
Mapping Multiple PC Inputs to a Single PS2 Controller
Multiple PC inputs can be mapped to a single PS2 controller. Shift-click any mapping button to open a menu which will allow adding and removing additional mappings. Any additional mappings added here will stack up in the list, allowing any one mapping to activate the PS2 button.
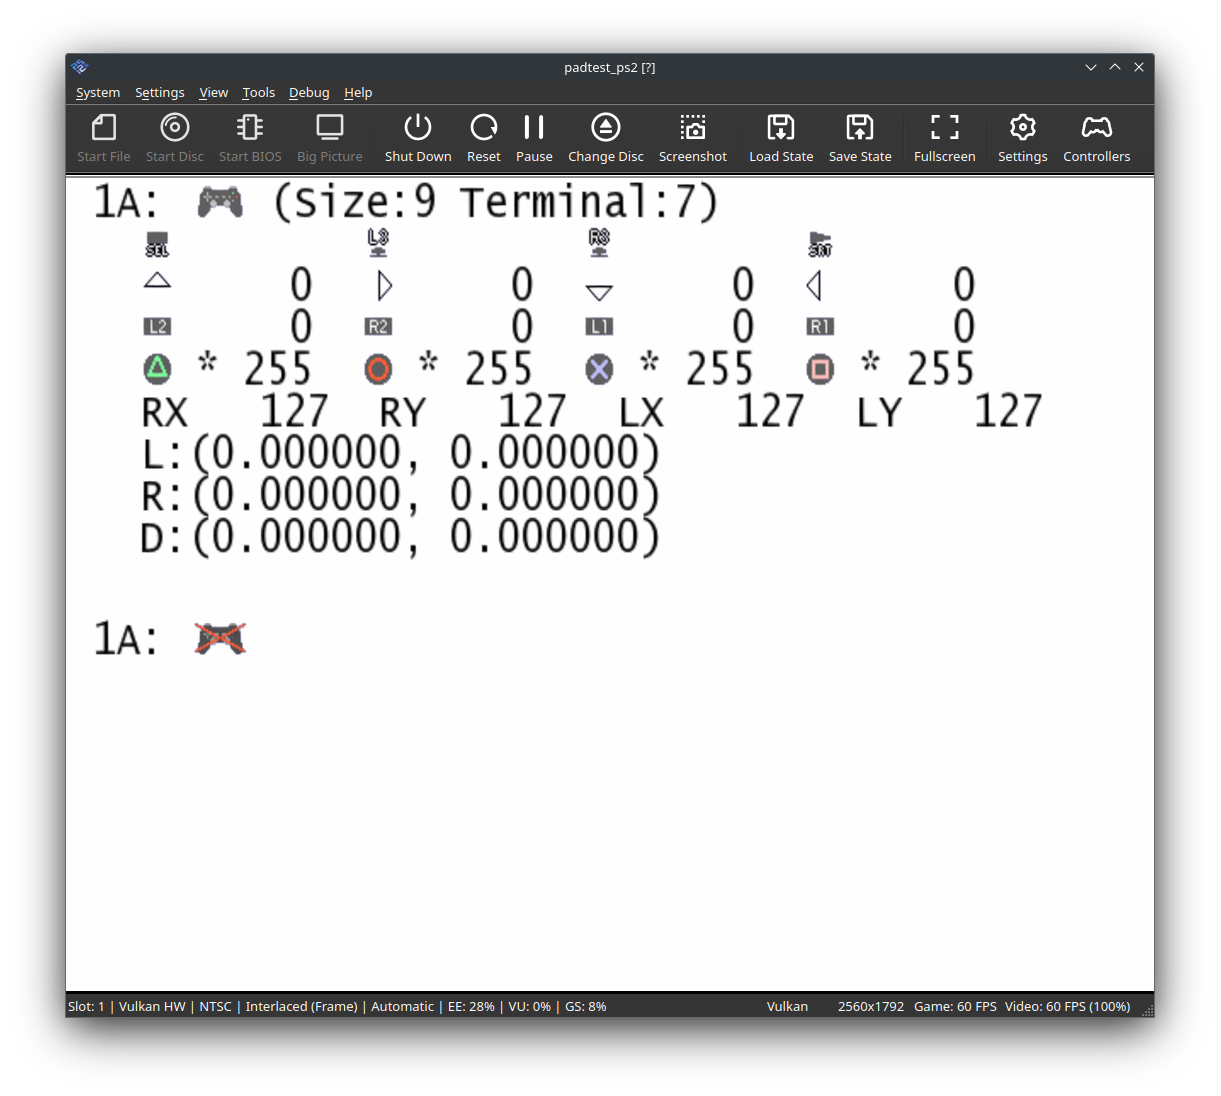
Testing your input mapping
PCSX2 currently does not have an input tester in its Qt UI or Big Picture UI.
To test your controller mappings, you can use the following PS2 Pad Test homebrew application. Download it, and either drag and drop it onto the main PCSX2 window, or add it to one of your games folders and refresh your games list.
When launched, the homebrew will display all possible DualShock 2 inputs. Press some of the buttons on your controller that you have mapped, and verify that the buttons on screen are reacting to your inputs.
Setting up pressure sensitivity
Pressure sensitivity is currently only available when using original DualShock 3 controllers. If other controllers receive hardware and driver support for pressure sensitivity in the future, they may be added to this document.
Only original DualShock 3 controllers are compatible with pressure sensitivity. Third party models will not work.
Windows
- Download and install DsHidMini.
- Set DsHidMini to SXS mode.
- Enable the SDL Input Source in PCSX2, if it is not already.
- Click the "Automatic Mapping" button and select the SDL entry matching your controller.
Linux and MacOS
Pressure sensitivity is supported natively through SDL. You do not need to install any additional software to use pressure sensitivity.
Input Profiles
What is the Purpose of an Input Profile?
Input Profiles are a way to override your normal "Shared" mappings. You can use an Input Profile when you want a completely different controller setup for a specific game. For example, you may create an Input Profile for games which use a guitar controller, rather than changing your mappings every time you play those games. Avoid using Input Profiles unless you intend to make a special controller mapping for specific games.
Input Profiles are not used to map multiple PC devices to a single PS2 controller. See the "Mapping Your Controller Buttons" section above for information on how to do this.
Why Isn't My Game Recognizing My Profile?
The Shared Input Profile is built into PCSX2 and is what all games default to unless told otherwise. When creating an Input Profile, the name prompt tells you to change the Input Profile in your Game Properties.
If you want to use a custom Input Profile for one or more games, then you need to assign it to those games individually. In your games list, right click the game you want to apply a custom Input Profile to, hit Properties, then on the Summary tab, select the appropriate item under Input Profile.
Can I Use Profiles to Switch Mappings While Playing?
This is not and will not be a supported feature in PCSX2. Use external software to do this.
Peripherals & Accessories
Multitap
Multitaps are physical devices sold separately for the PlayStation 2. A multitap fills both a controller and memory card port and expands each port to four slots.
PCSX2 currently does not support multitapped memory cards.
For games which support more than two players, a multitap is required to connect more than two controllers. Depending on which port you enable a multitap for, controllers labelled A-D will be added for that port.
For example, enabling multitap in port 1 will add controllers 1-A through 1-D. The A slot will always be the "original" controller port, with the B-D slots being the additional slots added.
The PlayStation 2 SDK places no restrictions on how games use a multitap. Some games will ignore multitapped controllers if you do not multitap a specific port or use specific slots. You will need to refer to your game's manual to understand which port the game supports multitaps for, and in what order a game expects multitapped controllers to be added.
Wheel Compatibility
When setting up your wheel device, you must pick the PS2 wheel that closest matches your PC wheel. Failing to do so may result in broken or missing FFB (Force Feedback), or unresponsive steering.
- Driving Force: 270 degree, no FFB.
- GT Force: 270 degree, FFB supported.
- Driving Force Pro: 900 degree, no FFB.
- Driving Force Pro (rev11.02): 900 degree, FFB supported.
Some games may not support FFB on certain wheel types, even if that wheel supports FFB. Even if this is the case, do not switch your emulated PS2 wheel to a type which does not match your PC wheel.
Buzz Controller
Windows Setup
PS2 Buzz controllers can be used on a PC but may need extra setup steps on Windows.
If your Buzz controllers do not appear in the list of available devices in PCSX2:
- Hit Start, type Device Manager and hit enter.
- Locate the Buzz controller. It is likely going to be in the Universal Serial Bus controllers section, named Standard USB HUB and have a yellow warning triangle on it.
- Right click and go to Properties.
- Click Update Driver > Browse Computer for Driver Software > Let me pick from drivers on my computer > USB Input Device.
- Click OK, and exit out of Device Manager.
Your Buzz controller should now be detected by PCSX2. You may need to close and reopen PCSX2 if it is not immediately available.
Known Issues
Steam Input Hijacking
Steam's built-in controller support can be useful, but unless carefully configured, will send random keyboard inputs to your PC by default. The two most common symptoms are the circle button pausing your game and the start button bringing up PCSX2's Big Picture pause menu.
A few options work around this issue. We've ordered them from simplest first, to most complicated last:
- Fully exit Steam (right click in the system tray, then Exit).
- Disable controller support in Steam.
- Change the keyboard mappings for your controller in the Desktop Layout of your Steam controller settings.
- Change the hotkey mappings in PCSX2 to no longer include any of the keyboard keys used in the Desktop Layout of your Steam controller settings.
Crashes Due to EZFRD64.dll
Many third party/knock off controllers and adapters use a buggy driver known generally as "EZFRD64.dll". It will always be located under C:\Windows\USB_Vibration. Other variations of the DLL file exist as well, but will always be in the same folder. The driver corrupts both its own memory and that of any programs it tries to interact with. PCSX2 will crash whenever a controller using this driver is plugged in.
The only solution is to remove the buggy DLL files from your system. There are two ways you can go about this:
- Make sure PCSX2 is closed and the controller is unplugged. Then delete the
C:\Windows\USB_Vibrationfolder. - If you ran an installer for the controller drivers, check the "Uninstall a program" list in the Windows Control Panel to see if a vibration driver is listed. If found, uninstall it and reboot your computer.